
Knowing how to cure and store garlic plays a major role in how long your harvest keeps. Cured and stored right, softnecks outlast hardnecks by several months, and how you store them matters more than which one you grew. Curing isn't complicated, but it's where more crops get ruined than anywhere else. We cure every bulb we sell in our own barn, so most of what follows is how we actually do it.
Here's the process, from harvest through storage.
Key takeaways
- Cure garlic 3 to 6 weeks in a shaded, well-ventilated space. Ours takes 3 to 4 weeks in the cure barn, and your timing depends on your temperature and humidity.
- Never cure bulbs in direct sun, and don't wash them. Brush the big clumps of dirt off and leave the papers alone.
- Store cured garlic dry, out of direct sun, with plenty of airflow. Storing it at room temperature is the best way to keep it from sprouting early, as long as you hold enough humidity that it doesn't dry out.
- Don't refrigerate garlic you plan to keep, with two exceptions. Cold is the signal that breaks a clove's dormancy, so refrigerated garlic begins to grow as soon as it warms back up. The exceptions: the crisper drawer, as cold as it goes without freezing, will artificially vernalize a hardneck grown outside its zone; and Rutgers recommends the fridge bin at 32 to 35 degrees F for garlic you intend to eat. Expect roots either way, since that drawer is humid.
- Handled and stored right, softnecks outlast hardnecks by several months. Published figures vary a lot; ours hold from August into November at 70 degrees and 65 percent humidity.
Why curing matters
Uncured garlic is wet garlic. Curing is just drying, pulling the extra water out of the bulb. And water leads to rot: wet garlic feeds the pathogens that cause soft spots and breakdown. Store a wet bulb somewhere it can't dry and you might have days to a couple of weeks before it's not usable. Cure it first and the same bulb keeps for months.
Two things happen as the water leaves. The papers dry into the shell that makes storage possible, and the flavor concentrates. Fresh-pulled garlic tastes watery next to cured.
Skip the cure or rush it and you can get soft spots, mold in storage, and bulbs that spoil months early.
Curing starts at harvest
The first rule is to get the bulbs out of the sun. Our first year we left freshly dug bulbs lying in the field in 100-degree harvest weather, figuring the leaves would shade them. That, stacked on top of a soil problem we didn't know we had, cost us about half our first crop. It showed up weeks later in the cure barn: a blue-green tint on the papers, then transparent cloves, then bulbs that broke down entirely. It took both the UV and the soil problem compounding to do that much damage. UV is the trigger, not the heat alone.
Now the bulbs come straight in from the field the same day they're harvested. If you want the full field-to-barn sequence, our how to harvest garlic guide covers timing and harvesting without damage.
Two more don'ts at this stage. Don't wash the bulbs, since water is exactly what you're trying to remove. Brush off the big clumps of soil and stop there. You don't need to get the thin layers of dirt off now, and you'll brush the rest away after it's fully cured. And don't trim anything yet. Leaving the stalks and roots on gives the water a path out of the bulb as it dries, so leave them on through the cure.
How to cure garlic, step by step
- Pick the spot. Shaded, dry, well ventilated, with moderate temperature. A barn, garage, covered porch, or a spare room with a fan all work. Airflow is the thing people skimp on, and a cheap box fan fixes that. One more thing: the room can't be sealed. Airflow alone won't help if the humidity climbs to 100 percent, because then the water has nowhere to escape to.
- Spread it out. Lay the bulbs on racks or screens, or tie them in small bundles and hang them. One layer is ideal, but two or three layers, even more, will work as long as air can still move through the garlic. The goal is air touching every bulb. No solid piles that trap moisture in the middle.
- Wait 3 to 6 weeks. In our barn it takes 3 to 4 weeks. Cooler or more humid spots take longer, and warm dry ones finish faster.
- Test the neck, not the papers. Cut the stalk off 4 to 6 inches above the bulb and look at the center of the cut. If there's any moisture in the middle, it's not done. Leave that much stalk on so you can cut a little lower and check again the following week. Dry, wiry roots are also an indicator. Loose or rustling papers are a bad sign, not a good one, since they mean the bulb's outer barrier is already breaking down.
- Trim and clean. Once it's fully cured, trim the roots close, cut the stalks back to an inch or two above the bulb, and rub off only the dirtiest outer paper. The papers are the bulb's storage protection, so take off as little as you can. We like to see at least five intact papers left on a bulb headed for storage. Softnecks you plan to braid are handled differently: braid them shortly after harvest, before they're fully dry, and they finish curing while braided.
How we cure at the farm
Leaving the stalks on throughout the cure is the ideal, since it gives the bulb more time to dry down and the extra cover protects it. For a home garden, do it that way. At our volume it isn't possible. The labor to leave every stalk on and come back to trim each bulb later is too cost prohibitive for a commercial crop beyond a certain size, so our harvester trims the stalks off in the field as it harvests, and we cure the trimmed bulbs.
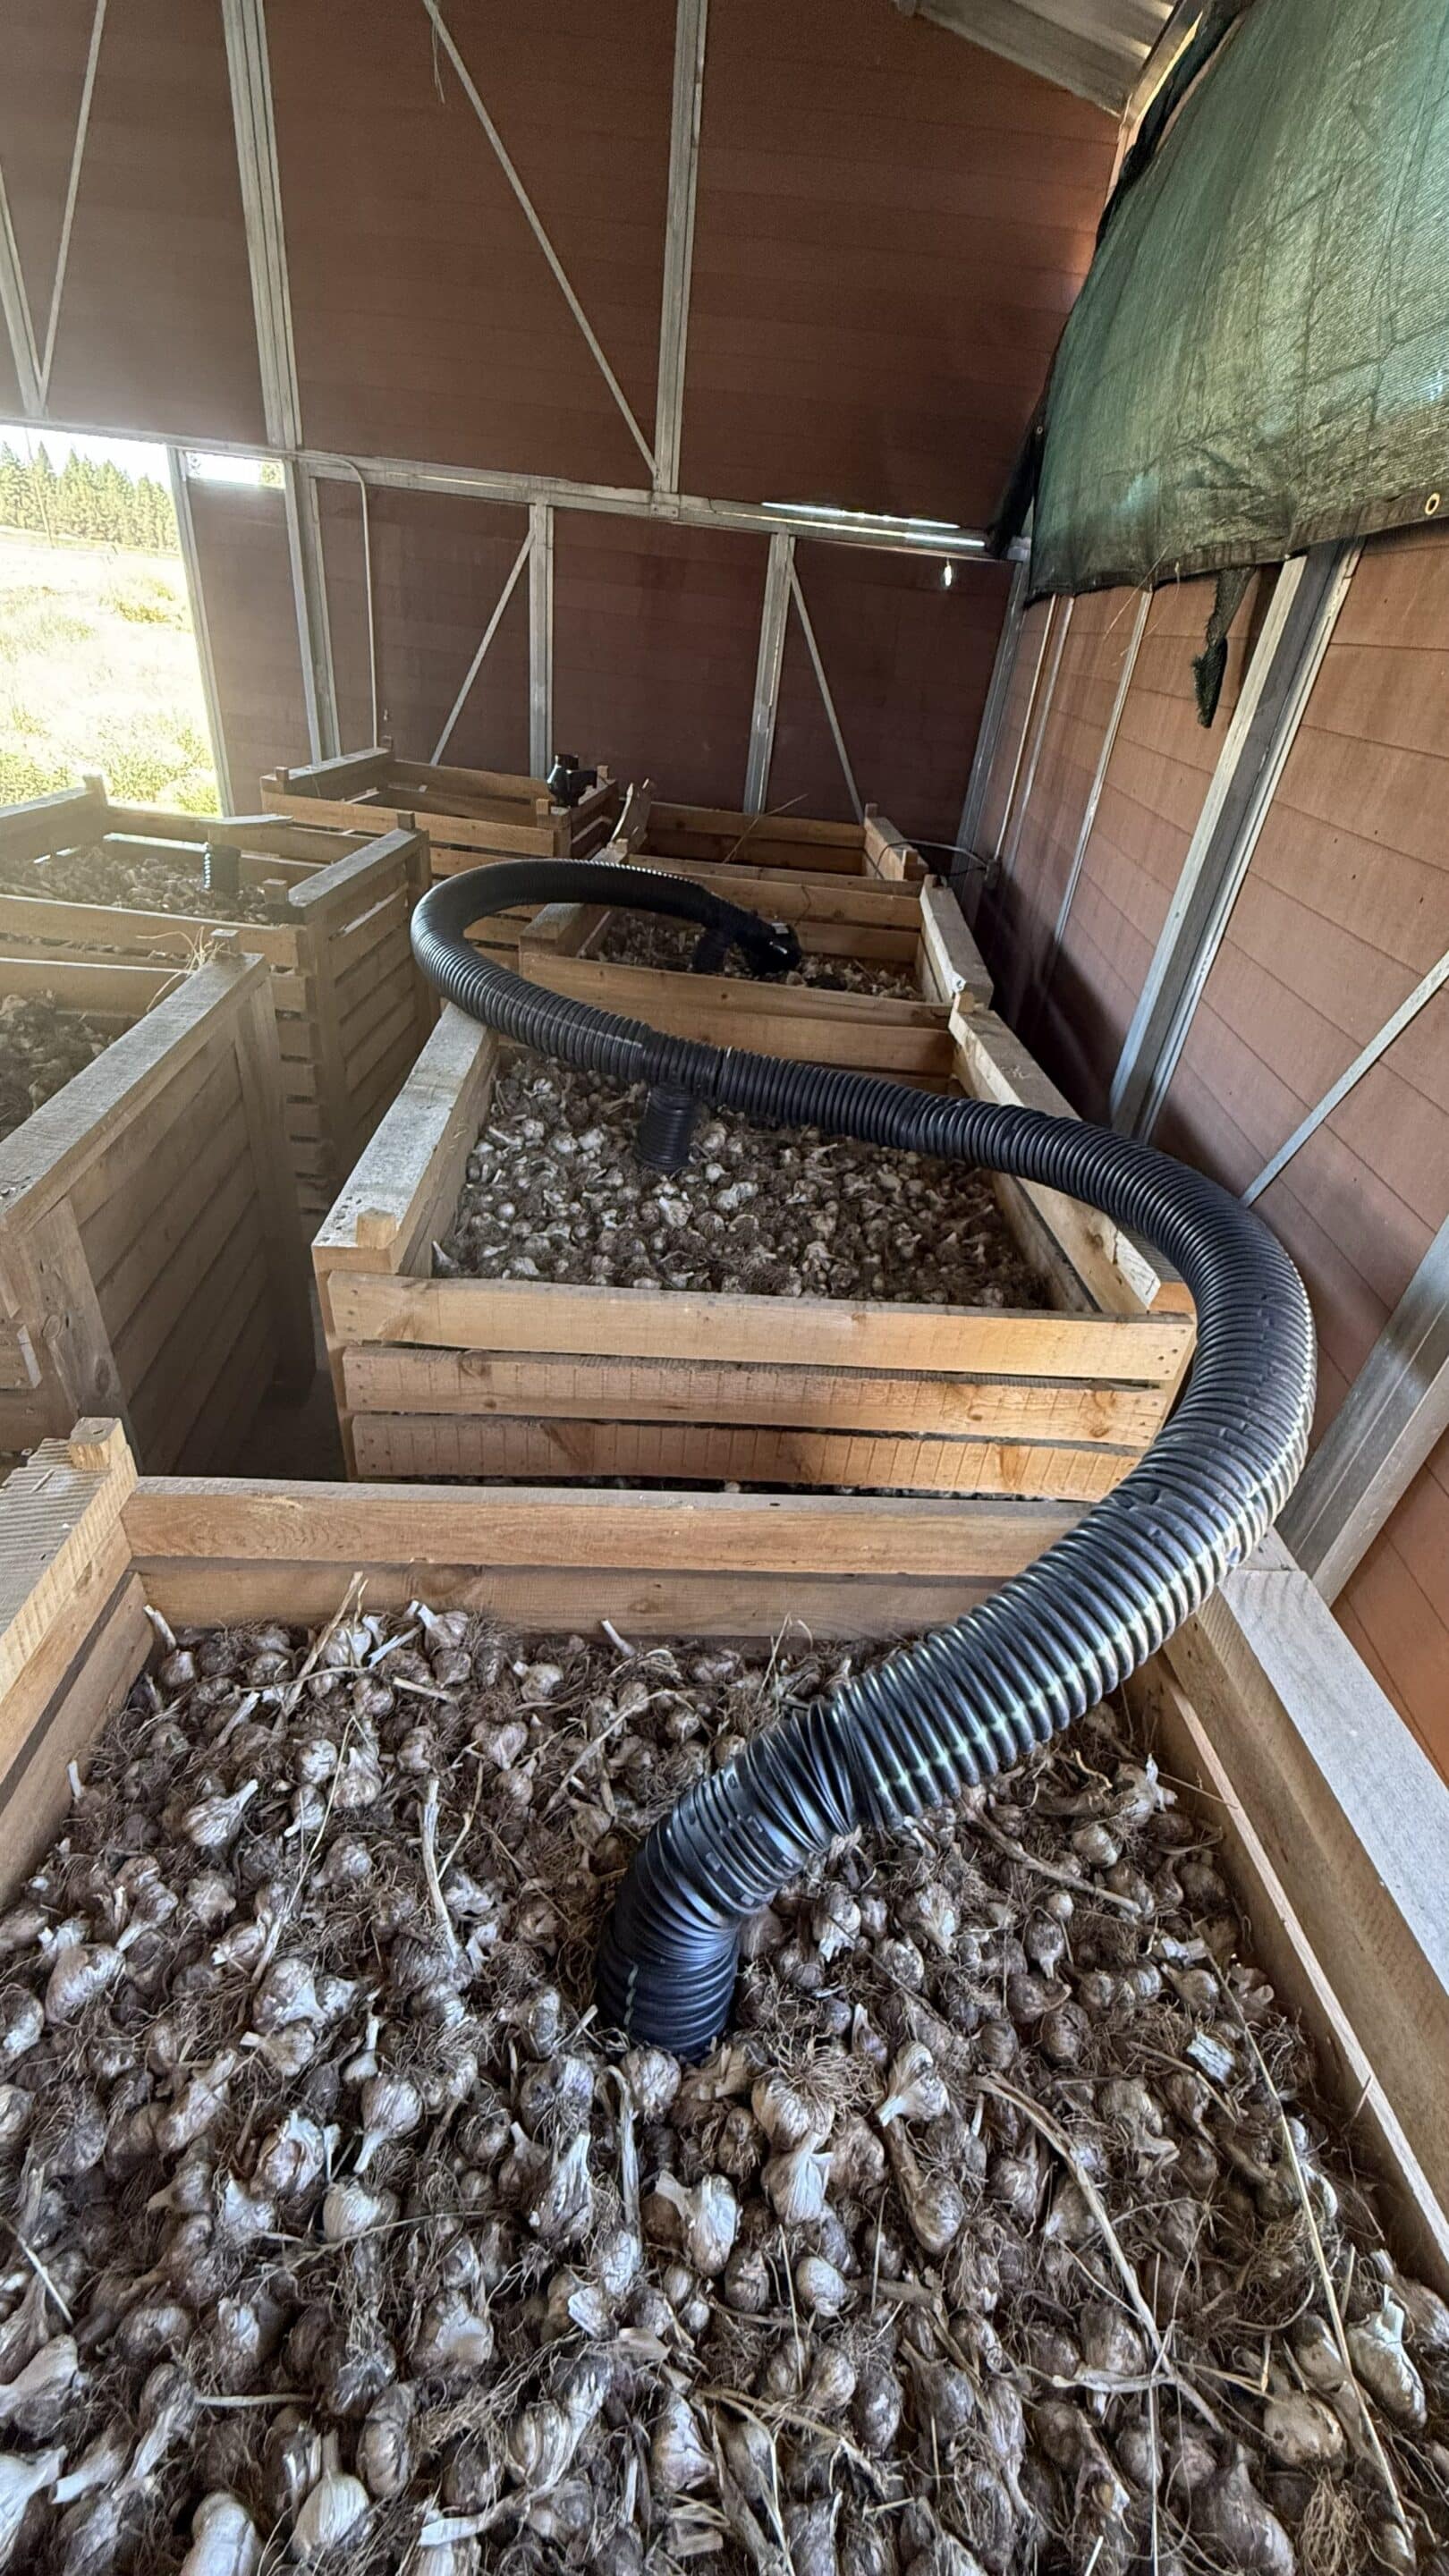
We can't hang bundles or lay out screens anymore either, since we bring in far more garlic than our old rack system would hold. So we moved to curing in bulk crates with air forced through them. Our crates are built from 1x4 boards with a 1-inch gap between the boards on every side and the bottom, which lets air move through the whole thing passively. In the center of each crate we bury a 4-inch perforated drain pipe, capped at the bottom. A fan pushes air through solid tubing along the top of the crates and into that center pipe, and from there the air reaches the middle of the crate and pushes the moisture out through all the gaps between the boards.
We used to cure on tall bays of racks. The racks were 2x2 frames in a 4-foot by 4-foot square with chicken wire or hardware cloth, and each one held only about 100 pounds of garlic. We outgrew that fast, and it was a pain to get the garlic off the racks without damaging it. It worked for our purposes while we were still learning, and it would still work at a much smaller scale, built a little differently.
The principle is the part that matters for you, whatever your scale: moving air on every bulb, out of the sun, until the necks are dry. A box fan in a spare room is doing the same job our curing barn does.
Handle it gently
Our first professional sorting setup had hard metal surfaces, and the bulbs knocking against them bruised something like 90 percent of the garlic we ran through the machine before I retrofitted it. You couldn't see it at first. You saw it weeks later, as the bruised bulbs broke down early in storage. We were lucky and caught it quickly, after only a fraction of the crop had gone through, because I stopped, got curious, and started peeling cloves. It's a good reason to check your work, the same way you would in a math class: don't assume, verify.
At home the same idea applies. Don't toss bulbs into buckets, don't knock two together to shake dirt off, and don't stack anything heavy on them. A bruise you can't see now will turn into a clove that molds later.
One more tell, and it works on any garlic. Whole, undamaged garlic barely smells. That strong garlic smell only forms when the tissue is broken, because breaking the cells is what creates the smell in the first place. So a strong smell coming off a bulb that looks fine means something has broken down inside it. Find that bulb and use it first, or throw it out if it's already too far gone.
How to store garlic after curing
Cured garlic wants three things: airflow, moderate humidity, and a spot out of direct sun. It doesn't need to be dark, it just can't sit in the sun. A pantry, a cellar corner, or a cool closet usually works.
Temperature is where the advice gets genuinely muddy. The universities don't agree with each other.
- Rutgers: "Store bulbs for eating at 32 to 35 degrees F with 65 to 70% relative humidity, such as in the refrigerator vegetable bin."
- Cornell: "Don't be tempted to store garlic in your fridge." They call for 56 to 58 degrees F at 45 to 50 percent humidity.
- UMass: long-term storage at 30 to 32 degrees F and 60 to 70 percent humidity, and cloves "break dormancy most rapidly between 40 to 50 degrees F."
Three land-grant universities, three different answers, and one of them puts your garlic in the exact appliance another one tells you to avoid.
What we do is hold all of our garlic at about 70 degrees F and 65 percent humidity. That came from a friend with a wealth of knowledge and experience, and the thinking behind it is to keep the garlic close to the conditions it saw at harvest. It lasts from August into November on that, and that's a baseline rather than a ceiling. Some of it goes longer.
We're also not trying to hit nine months. We sell seed garlic and we want to be sold out by December, so spending the electricity to hold a room near freezing for garlic we won't have in six months doesn't make sense for us. We did run a cold room once, with CoolBots on our AC units. The garlic lasted about as long as it does now, but it failed differently: instead of drying down it went squishy, or moldy.
Cornell would tell you we're too warm, since they say above 66 degrees F garlic shrivels quickly. We store ours warmer than that, and at a higher humidity than they call for. We're still working out the best conditions we can get out of the building we have. That's the honest advice for you too: you don't need perfect conditions, you need the best ones you can actually manage.
The part worth understanding is why cold is complicated. Cold doesn't stop garlic from sprouting. Cold is the signal that breaks the clove's dormancy, the same job winter does in the ground. Garlic held cold is primed, and it sprouts and begins to grow as soon as it warms back up. The fridge adds a second thing: it's humid, and garlic sitting in that humidity will usually push roots whether you wanted it to or not.
Good containers: mesh bags, paper bags with the top loosely folded, baskets, clay garlic keepers, or softneck braids hung somewhere airy. Anything that breathes.
Bad containers: plastic bags and sealed tubs, which trap moisture and grow mold.
There is one deliberate use for the fridge. If you garden somewhere that never gets cold enough to grow a hardneck, the crisper drawer, set as cold as it goes without freezing the garlic, will stand in for the winter the plant needs. Expect roots. That's the humidity, and it's fine if the garlic is headed for the ground anyway.
How long will it keep?
Softnecks outlast hardnecks, and the published numbers vary more than you'd expect. Rutgers puts softnecks at six to eight months against hardnecks' two to four. UMass says well-cured garlic holds 6 to 7 months at 30 to 32 degrees F, and UC Davis reports more than 9 months at that same temperature. Ours, at 70 degrees and 65 percent humidity, lasts from August into November, and some of it goes longer than that.
More than anything, storage life comes down to the conditions. The same bulb that keeps for months in a dry, airy spot won't keep nearly as long in a warm, damp one.
Every softneck we grow is an artichoke, so if long storage is the goal, weight your planting toward that family. Any time you go to grab a bulb, use up anything going soft or sprouting first. The full breakdown by type is in our softneck garlic and hardneck garlic pages.
Storing seed garlic until planting
If part of your harvest, or an order from us, is going to be planted, store it the same way: dry, airy, papers intact, and no refrigerator. Keep your biggest bulbs for seed, since big bulbs hold the biggest cloves and big cloves grow big bulbs. Hold them at room conditions until your fall planting window opens.
Here's where we part ways with the university guidance, and I'd rather say so than pretend we don't. UMass puts seed garlic at 50 degrees F and 65 to 70 percent humidity. The New England Vegetable Management Guide says 55 to 60 degrees F at the same humidity, and warns that "storage of planting stock at temperatures below 40 degrees F results in rough bulbs, side-shoot sprouting (witch's broom) and early maturity, while storage above 65 degrees F results in delayed sprouting and late maturity."
We store ours warmer than that, at the same 70 degrees and 65 percent humidity, because delayed sprouting is exactly what we're after while it sits in the building from harvest until it ships. Garlic held near the conditions it saw at harvest behaves like it was just harvested and stays dormant. Cool it down and you've handed it the front half of winter early.
Worth saying plainly, since it's our seed you'd be planting: the guide lists delayed sprouting and late maturity as two separate outcomes, so late maturity reads as a later harvest. We don't see that. Our garlic harvests at the same time as the garlic we used to hold in cold storage. Planted mid-September and watered in, we get green shoots on every hardneck inside two weeks, and on the softnecks in three to four, which in our climate is exactly what we want. I can't tell you whether the late maturity they're describing is about sprouting or about the harvest date, but it isn't showing up here.
So take your pick, and know the tradeoff. The researched number is 50 to 60 degrees F, and the cost they name for going warmer is later maturity. What we actually do with the seed we sell you is about 70 degrees and 65 percent humidity. Either way, avoid 40 to 50 degrees F. That's the one band every source agrees on: it's where dormancy breaks fastest. Our how to plant garlic instructions go into what to do with your order once it arrives.
Frequently asked questions
How do I know when garlic is done curing?
Cut the stalk off 4 to 6 inches above the bulb and look at the center of the cut. Any moisture in the middle means it isn't done, so leave the stalk long and check again a week later. Dry, wiry roots are also an indicator. Loose papers are a bad sign, not a good one, since they mean the outer barrier is breaking down.
Should I wash garlic before storing it?
Never. Brush the loose dirt off after curing and rub away only the filthiest outer paper. Water undoes the drying you just spent weeks on.
Why is my stored garlic sprouting?
The fridge is often the culprit if that's where it's been, since cold is what breaks a clove's dormancy in the first place. But big temperature swings will do it too: large day-to-night swings, or an air conditioner off for a long stretch, are enough to tell the garlic that a season has changed. Keep it at a steady room temperature, dry, with airflow, and sprouting slows way down. And if it has sprouted, don't panic. You can still plant sprouted garlic. Just get it in the ground as soon as you can.
Can I freeze garlic?
Yes, for cooking. Whole raw bulbs don't freeze well, but peeled or chopped cloves do, and freezing stops sprouting for good. The texture softens once it thaws, so use frozen garlic in cooked dishes rather than raw.
Can I eat garlic straight after harvest, without curing?
Yes. Fresh green garlic is good eating, just milder and more watery than cured. It won't keep, though, since uncured garlic is wet and wet garlic tends to rot in days to weeks. It's still best to cure everything you're not using right away, but if you can't wait, fresh garlic is perfectly safe to eat.
Start with quality seed to have the best luck growing and storing
Every bulb we ship is fully cured in our own barn before it goes in a box. That's what buying certified organic garlic direct from the farm that grew it gets you. Pre-orders open March 1 and ship in September. Plant the biggest cloves and cook the rest.
About the author
I'm Zack Schallert, one of three owners of the farm, and I'm the CEO and lead farmer. I've been growing garlic since 2018, and gardening has always been a passion of mine. The quest for knowledge is my main reason for writing these posts. I pull from my own farm experience, from what I learn from other farmers, and from my own research. I won't pretend to know everything, and I'll get something wrong now and then, so expect these posts to change as I learn. If you spot something I got wrong, email me at contact@basalticfarms.com. Thanks for taking the time to read this.